Monday, April 6, 2020
This is the second part of a two-part blog series on how to set up an Extension development environment using Visual Studio code. In this article, we will continue to detail how to set up the environment in order to be able to debug an Extension.
We strongly suggest that you read our previous blog post before continuing with this one!
Prerequisites
- Visual Studio code with “AL language” Extension installed on your local computer.
- Microsoft Dynamics Business Central development license.
- Microsoft Dynamics NAV/Microsoft Dynamics 365 Business Central installation on 1ClickFactory. In this example, we will be using a Dynamics Business Central version 15 installation.
- Configured development environment.
Create a New Web Server Instance
In order to be able to set breakpoints and debug your Extension, you will need to set up a second Web Server Instance. To do this, follow the steps below:
- Connect to the virtual machine: open either Microsoft Dynamics NAV/Microsoft Dynamics 365 Business Central Administration Shell or Windows PowerShell ISE as an administrator (right-click and select “Run as administrator”).
- Next, use the following cmdlet, but do not forget to change the parameters according to the settings of your Microsoft Dynamics NAV/Microsoft Dynamics 365 Business Central development instance:
New-NAVWebServerInstance -Server localhost -ServerInstance DEV-INSTANCE -WebServerInstance DEV -AddFirewallException -CertificateThumbprint "Copy from instance setup“ -ClientServicesCredentialType NavUserPassword -ClientServicesPort "Copy from instance setup“ -ContainerSiteName "Default Web Site" -SiteDeploymentType SubSite -WebSitePort 8081
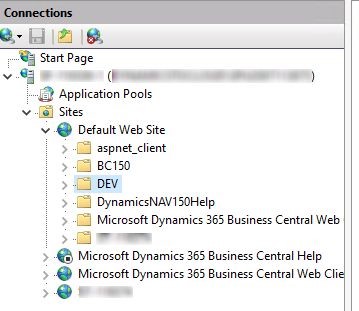
3. After running this cmdlet, open Internet Information Services (IIS) Manager and check if the new subsite has been created:
4. Next, select “Default Web Site” and on the right-hand panel select “Bindings…”. Then click “Add” and enter the following parameters:
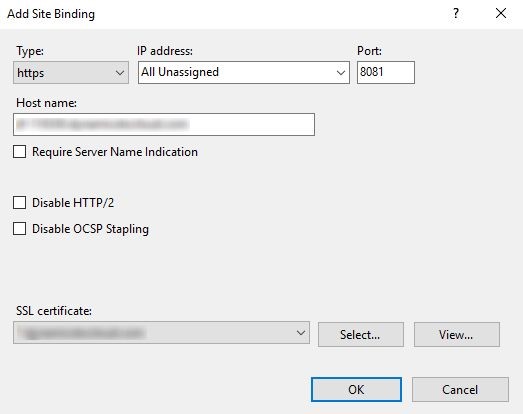
5. For “Hostname”, provide your virtual machine’s name and for SSL certificate, select appropriate certificate.
6. Next, we need to open a new endpoint in the Self-Provisioning Portal for the new Web Service port. To do this, navigate to “Application servers”, then for the selected application server, click on the gear icon and choose “Show endpoints”. Once here, click on the green “Create” button and enter the information about your endpoint, then click “Create”.
7. Now, go back to the Internet Information Services (IIS) Manager and restart the “Default Web Site”. Next, open “Business Central Administration”, navigate to your development instance settings, click “Edit” and in the “Client Services” tab, change the “Web Client Base URL”. In our example below, the new URL is https://<server name>:8081/DEV

8. Last, click “Save” and restart the service instance.
Modify Extension Parameters in Visual Studio Code
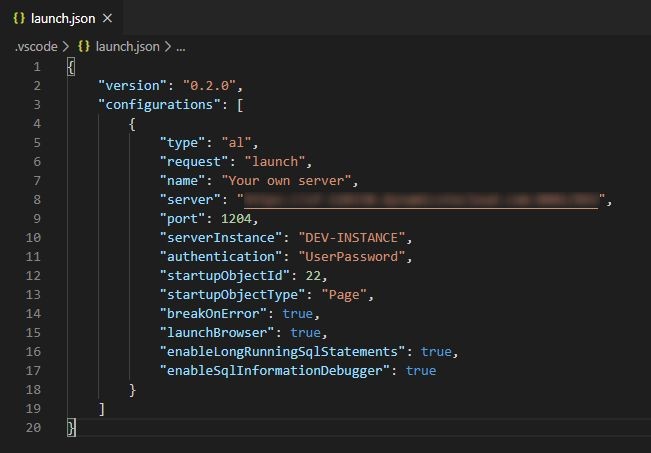
1. First, open your project in Visual Studio Code, then edit the “launch.json” file. For the “serverInstance” parameter enter your new “Web Client Base URL” and do not forget to include “breakOnError” and “launchBrowser” parameters:
2. Save this file.
3. Next, we need to download the symbols once again. Open the “Command Palette” and type in the command “AL: Download symbols”. You will need to authenticate yourself. For “Your username” copy the value from the “User Name” field in the user‘s card in the Microsoft Dynamics NAV/Dynamics 365 Business Central client and for the password use your Dynamics 365 Business Central Password.
Test the Debugger
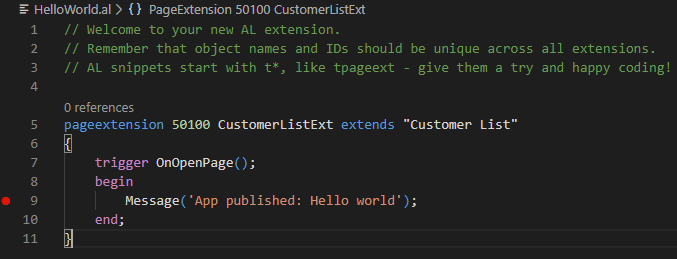
To check everything is working, open the file “HelloWorld.al” and toggle to a breakpoint where you want the debugger to stop. This can be done multiple ways:
- Place the cursor on the line you would like to break. Then in the top menu select “Debug” and “Toggle Breakpoint” or simply just press F9.
- Using your mouse, click on a red dot near the numbers on the left-hand side.
Now we are ready to debug. This can also be done in a few ways:
- In the top menu select “Debug” and then choose “Start Debugging” or just simply press F5.
- Alternatively, in the left menu panel navigate to “Run and Debug” (bug symbol) and in the top of the newly opened panel, click on a green arrow.
After doing this, a new web browser window should open. You might be asked to enter your credentials. Use the same credentials you used to download the application symbols. Once logged in, open the Visual Studio Code. You should see something similar to this:
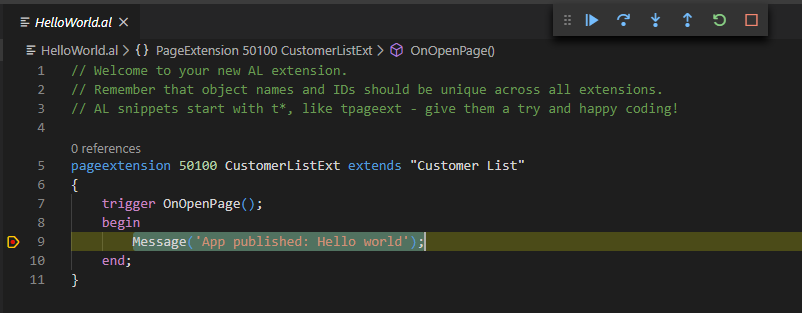
Congratulations, you have now successfully started debugging your Extension. Please find out more information on how to debug in the official Microsoft guide, by following this link: https://docs.microsoft.com/en-us/dynamics365/business-central/dev-itpro/developer/devenv-debugging .
About 1ClickFactory Self-Provisioning for Microsoft Dynamics NAV/Microsoft Dynamics 365 Business Central on Azure
With 1ClickFactory’s Self-Provisioning for Dynamics NAV/Business Central on Azure service, Microsoft Dynamics Partners can easily deploy NAV/Business Central solutions on Microsoft Azure through our platform in 1 hour or less. It’s a self-service and available 24/7 on a highly secure and readily supported environment.
Find out more about the 1ClickFactory Self-Provisioning for Microsoft Dynamics NAV/Microsoft Dynamics 365 Business Central on Azure service or contact us at service@1clickfactory.com.