Monday, August 24, 2020
Table of contents:
- Development Required to Authenticate through Azure Active Directory
- Register the Application in the Azure Active Directory (AAD) Resource on the Azure Portal
- Configure the Application in Azure Active Directory
- Use the Microsoft Authentication Library to get an Access token
- Use the Access Token to Get the List of Environments
- Authenticating through Azure Active Directory Summary
Azure Active Directory (AAD) is useful when you want to control who (users and client applications) can access particular resources (e.g. Microsoft Azure SaaS resources, Office 365 documents and Dynamics 365 installations).
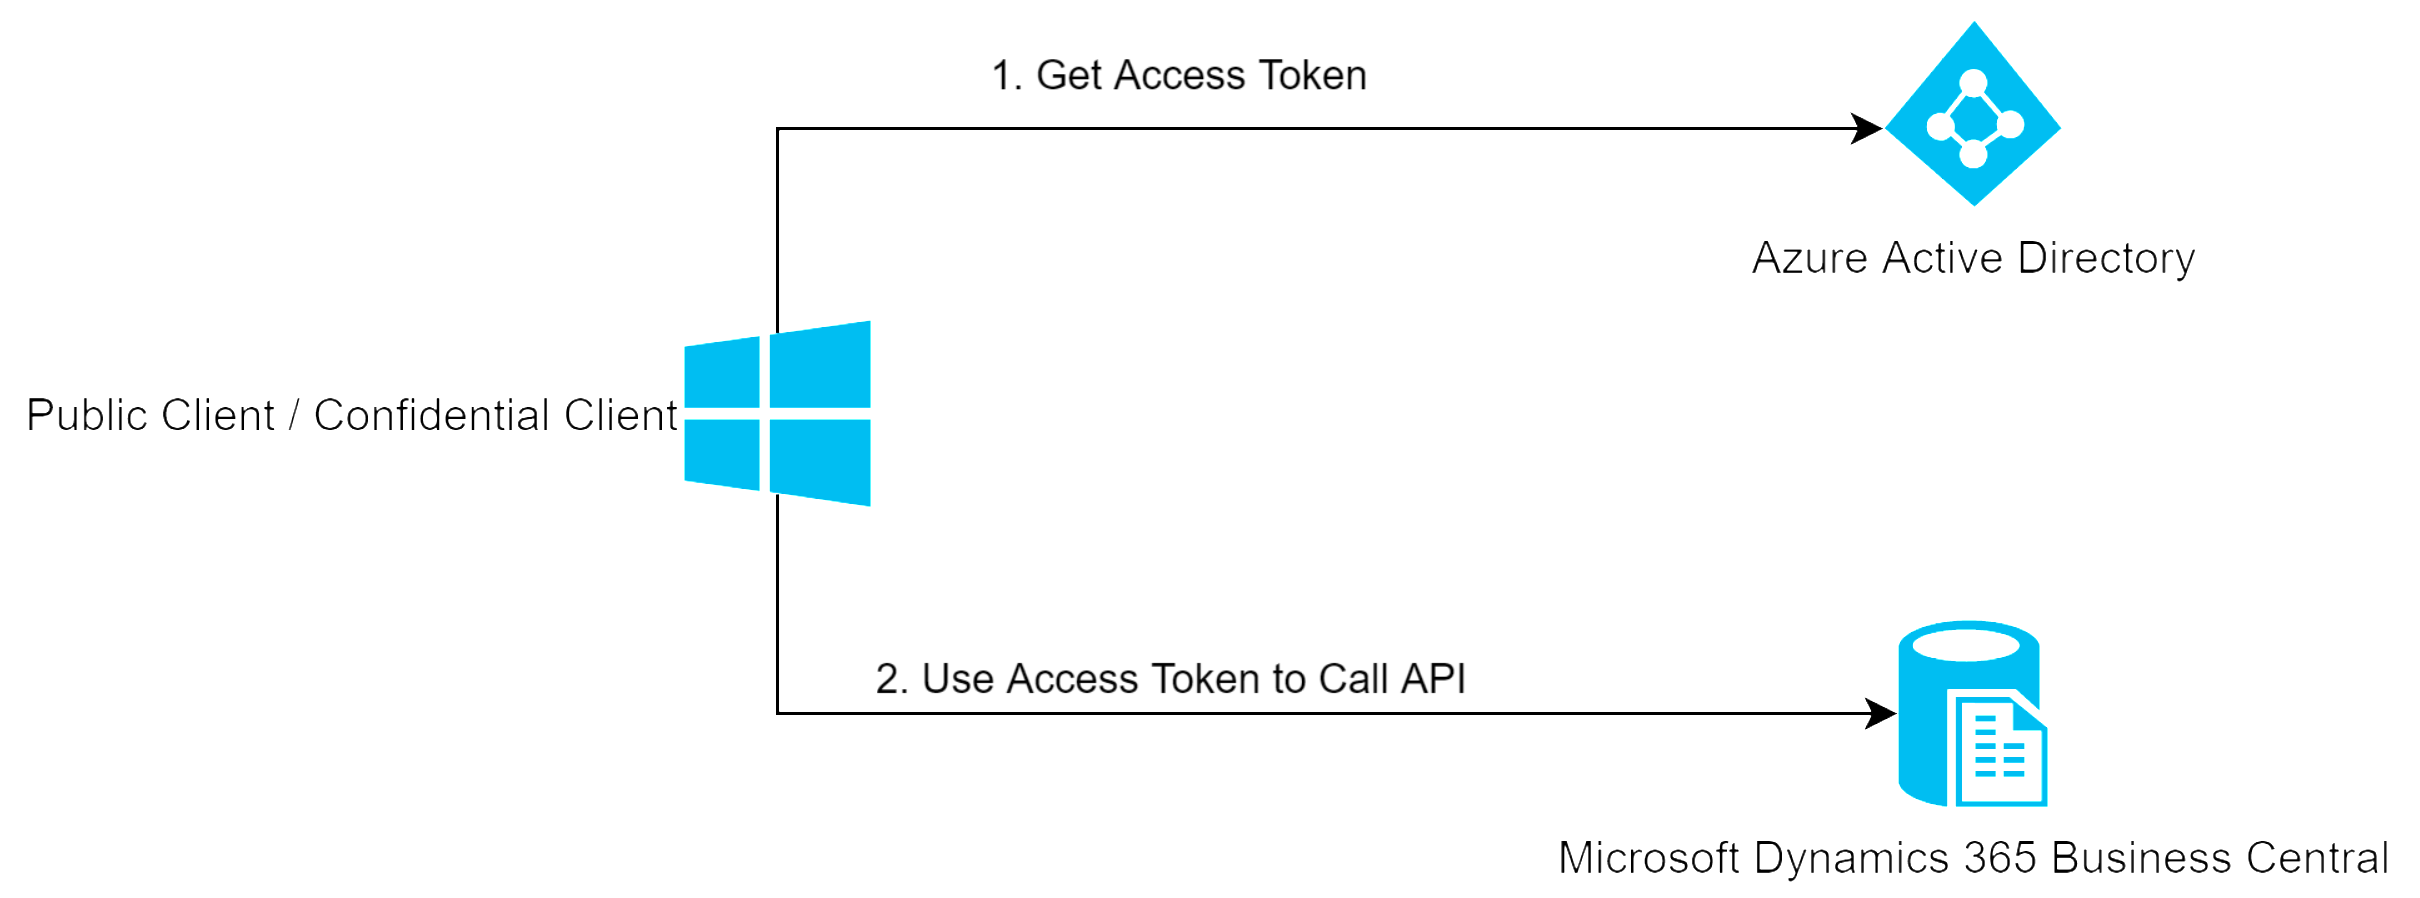
One of Azure Active Directory’s (AAD) use cases is 3rd party client application authenticating through AAD to call the API of Microsoft Dynamics 365 Business Central installation (BC).
This article covers how to implement such a client application using the Microsoft Authentication Library (MSAL) and the C# language. The process looks like this:
- The client application calls an Azure Active Directory endpoint which returns an Access Token.
- The client application uses the Access Token to exchange information from a Dynamics 365 Business Central installation through a Business Central API.
Development Required to Authenticate through Azure Active Directory
Let’s say our goal is to create a client app which would authenticate through AAD and get to all environments through the Business Central installation.
Development would consist of the following steps:
- Register the application in the Azure Active Directory (AAD) resource on the Azure Portal.
- Configure the application in the Azure Active Directory.
- Use the Microsoft Authentication Library (MSAL) in the Client App and call the AAD endpoint to get the Access Token.
- The client App will use the Access Token to call the Business Central API and get a list of environments.
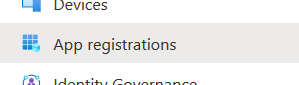
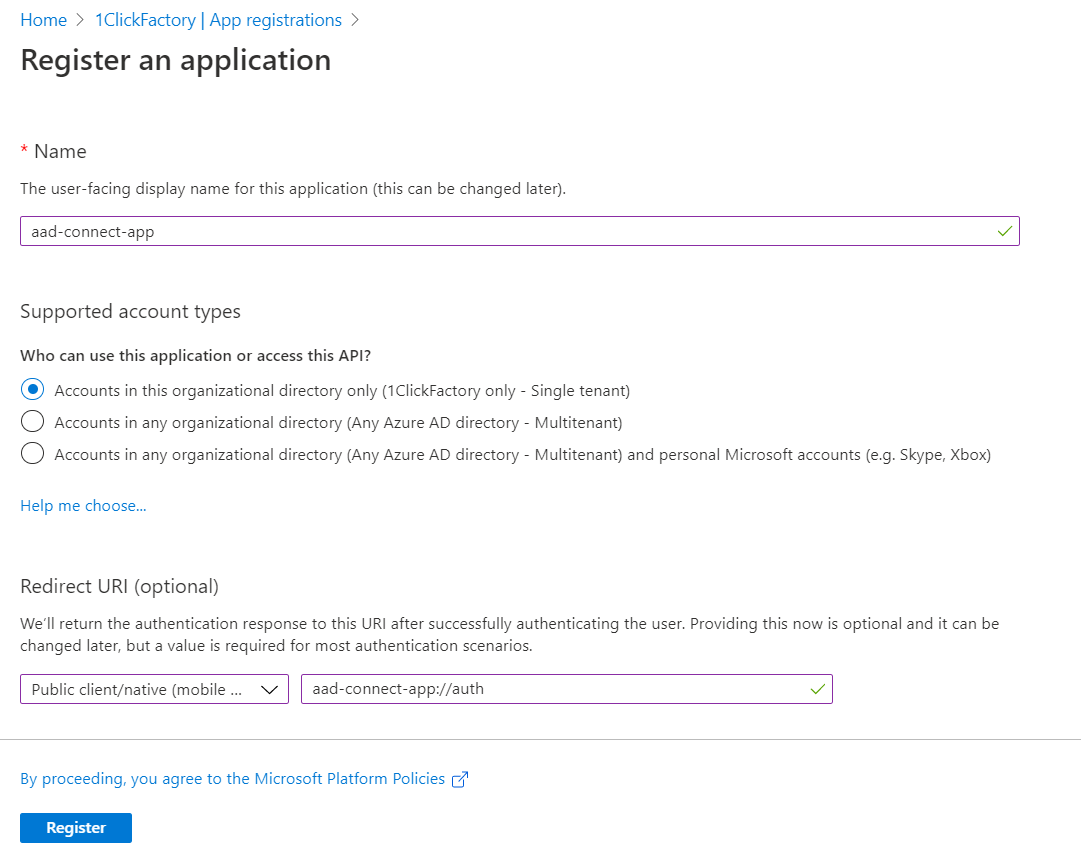
1. Register the Application in the Azure Active Directory (AAD) Resource on the Azure Portal.
- Login to the Azure Portal https://portal.azure.com.
- Open the Azure Active Directory resource.
- Click on ‘App registrations’ (on the left side menu).
- Click ‘New registration’ (top menu).

- Register the new app by entering its name, choosing the account types and filling in a redirect URI.
2. Configure the Application in Azure Active Directory
Additional configuration is needed, so that this newly registered app works successfully:
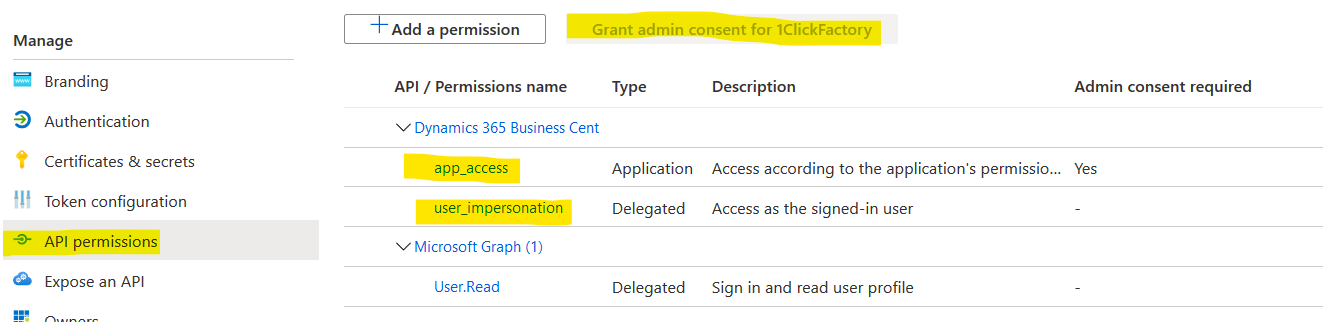
- API permissions must be added specifically for accessing the Dynamics 365 Business Central installation.
- Your AAD administrator must login and grant admin consent.
3. Use the Microsoft Authentication Library to get an Access token
Now we can move to writing the actual code which will use the configuration from the App registered in Azure Active Directory and will request an Access Token (it will be used to call the API). The Microsoft Authentication Library (MSAL) is used here. MSAL supports two types of Client applications which are used to get the Access Token:
- Public Client
The Public Client application usually runs on the user’s devices (for example, desktop, laptop and phone) and cannot be trusted to keep secret credentials (such as username or password). The user’s consent is needed for acquiring an Access Token. So, the user will be asked to enter his/her credentials when the application requires that Token.
- Confidential Client
The Confidential Client applications are usually deployed on servers where they can run as WebApps, WebAPIs or as a Daemon App. They can be trusted to keep secret credentials and no explicit user consent is needed for these types of applications to run.
Although these Client applications get the Access token differently, the Access Token itself is used in the same way for further requests from the Client to the Server.
We can start the development by creating a Visual Studio project. Depending on your needs, you can choose the project type (WebApp, WebAPI or just Console Application for demo purposes).
Also, in order to use the Microsoft Authentication Library (MSAL), we need to add it as a NuGet package in our C# based project. Whether you’re building a Public Client or a Confidential Client application – the NuGet package is the same: Microsoft.Identity.Client:

After this NuGet package has been added, let’s look at the code for getting the Access Token for each of the Client types.
3.1 Public Client
Some configuration values will have to be added to our application from the Azure Portal:
- Tenant ID – Azure Directory’s ID.
You can find the tenant ID in the Azure Active Directory resource or at the top of your App Registration’s Overview page.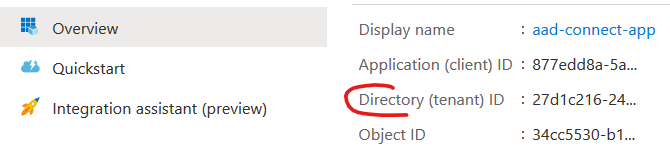
- Client Id – your App ID
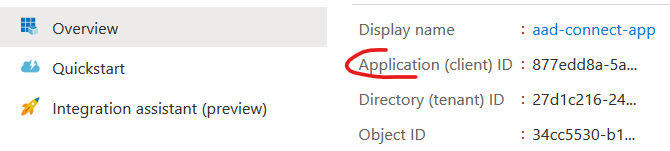
This can be found in the same App’s Registration page Overview:
- Azure Authority URI - https://login.microsoftonline.com/ + Tenant ID
- Redirect URI – This should be one you’ve setup in your App’s Authentication -> RedirectUris. For example, aad-connect-app://auth or http://localhost (this is used in the Console application example below).
- Scope – The scopes for which the token will be valid. In our case it’s the scope for Business Central: https://api.businesscentral.dynamics.com/.default
Here’s the code which will get the access token (of course, in a real-life application, the configuration should be taken from config files and not be hardcoded):
public string GetAccessToken()
{
var tenantId = "27d1c216-24…";
var clientId = "877edd8a-5a…";
var authorityUri = $"https://login.microsoftonline.com/{tenantId}";
var redirectUri = "http://localhost";
var scopes = new List<string> { "https://api.businesscentral.dynamics.com/.default" };
var publicClient = PublicClientApplicationBuilder
.Create(clientId)
.WithAuthority(new Uri(authorityUri))
.WithRedirectUri(redirectUri)
.Build();
var accessTokenRequest = publicClient.AcquireTokenInteractive(scopes);
var accessToken = accessTokenRequest.ExecuteAsync().Result.AccessToken;
return accessToken;
}
It’s also possible to get the token by calling AcquireTokenByUsernamePassword instead of AcquireTokenInteractive method (this requires an additional username and password) – this is not an interactive way, so a user is not asked for his/her credentials when the API is being called. However, if it’s an application running on the server and you want to authorize a user silently, it’s better to use the Confidential Client approach below to get the Access Token.
3.2 Confidential Client
The Confidential Client application uses part of the configuration as in the Public Application’s case, but additionally this setting is required:
- Client secret – The client application uses this string value to prove its identity when it requests an Access Token.
This can be created in your App’s Certificates & secrets page (please note that a secret’s value will be shown only once. If you forget it, a new Client secret will have to be created).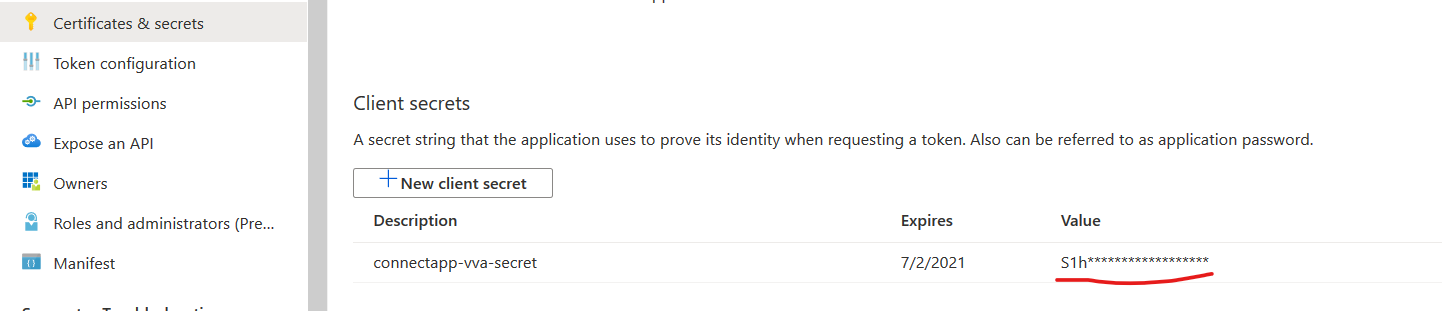
Here’s the code for getting an Access Token using the Confidential Client Application:
public string GetAccessToken()
{
var tenantId = "27d1c216-24…";
var clientId = "877edd8a-5a…";
var authorityUri = $"https://login.microsoftonline.com/{tenantId}";
var redirectUri = "http://localhost";
var scopes = new List<string> { "https://api.businesscentral.dynamics.com/.default" };
var clientSecret = "S1h…";
var confidentialClient = ConfidentialClientApplicationBuilder
.Create(clientId)
.WithClientSecret(clientSecret)
.WithAuthority(new Uri(authorityUri))
.WithRedirectUri(redirectUri)
.Build();
var accessTokenRequest = confidentialClient.AcquireTokenForClient(scopes);
var accessToken = accessTokenRequest.ExecuteAsync().Result.AccessToken;
return accessToken;
}
4. Use the Access Token to Get the List of Environments
Given that we know how to get the Access token, we can use it to call the API. It doesn’t matter which type of client (Public or Confidential) was used to get the Access Token in the GetAccessToken method, the API is called the same way:
- Add the Access Token to the Request Header’s preceded by “Bearer” prefix
- Call the API (in our case we just want to get all the environments in the Business Central installation)
Here’s the code sample:
public string GetEnvironments()
{
var accessToken = GetAccessToken();
var httpClient = new HttpClient();
httpClient.DefaultRequestHeaders.Authorization = new AuthenticationHeaderValue("Bearer", accessToken);
const string environmentsUri = "https://api.businesscentral.dynamics.com/environments/v1.0";
var response = httpClient.GetAsync(environmentsUri).Result;
var content = response.Content.ReadAsStringAsync().Result;
return content;
}
After executing the code above, you should now get the list of Business Central environments in JSON format:
{
"value": [
{
"aadTenantId": "27d1c216-24d..",
"applicationFamily": "BusinessCentral",
"type": "sandbox",
"name": "SANDBOX",
"countryCode": "DK",
"webServiceUrl": "https://api.businesscentral.dynamics.com",
"webClientLoginUrl": "https://businesscentral.dynamics.com"
},
{
"aadTenantId": "27d1c216-24…",
"applicationFamily": "BusinessCentral",
"type": "production",
"name": "PRODUCTION",
"countryCode": "DK",
"webServiceUrl": "https://api.businesscentral.dynamics.com",
"webClientLoginUrl": "https://businesscentral.dynamics.com"
}
]
}
Note: Newtonsoft.Json NuGet package can help to deserialize the response into C# objects.
Authenticating through Azure Active Directory Summary
So, we’ve authenticated through Azure Active Directory with Microsoft Authentication Library and got the data from the ERP server side. In our case it was the list of environments. However, other entities can be retrieved and updated using the approach as described above.
This is an example of a Web-ERP integration, particularly, an integration between two pieces of software:
- The client application based on Web technologies (HTTP, RESTful API, Microsoft .NET Framework, Microsoft Azure platform)
And
- An ERP system on the server (Dynamics 365 Business Central installation).
I hope you have found the article helpful and please click here to learn more about using Web technologies to bring ERP data online.